These days I have a lot of time on my hands and between an online test and an episode of Runaways I'm re-discovering my passion for DIYs (Do It Yourself). Back in the day I really loved crafting and creating new things, like converting a finished toilet paper roll in a pen organizer, or a chocolate box in a post-it organizer.
So today I'm showing you how you can transform an empty cereal box into an organizer! This is my latest project and my first one in two years. It's really easy and it can also double as decor (a really nerd one, in my case).
You'll need a comic (I know, it feels like murder, but the one I'm using I've already read three times and I won't read it again, because I don't like it that much), a pair of scissors, vinyl glue, a paint brush and, of course, the cereal box. I had already cut mine and wrapped it in wrapping paper, but I decided to make it more nerdy.

So, here you have a drawing I made on how to cut your cereal box, so that it becomes an organizer.

First thing first (after cutting the box), cut the parts of the comic and put them on the organizer to see how the composition looks. Move them around until you're happy with the design and make sure you put your favourite pieces in the front.

Before applying the glue put something under the box, like an old newspaper (as I did), to protect the table underneath. Then apply the glue directly onto the box and quickly place the comic pieces on it (the glue dries really fast). After this, apply a layer of glue over the comic pieces, to have a cool sort of polish and make it look more purposeful.
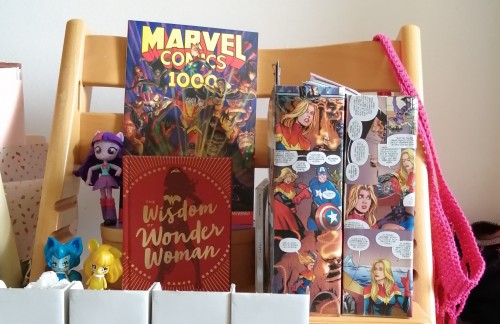
Now you have it! After doing all of this and letting it dry, you'll have a result similar to mine.
Now you have it! After doing all of this and letting it dry, you'll have a result similar to mine.

Now, for the finishing touches, I put a cool washi-tape on the bottom of the organizer.

Okay, I need to confess something... I didn't do the internal sides (where the two organizers touch) or the behind part, because you can't see them and... I was lazy.

But, hey, it looks really good! This is the end result and I'm really proud of it!

Credits
Foto di Sofia